Artec Leo Scanner: Difference between revisions
migration-of-wiki>Cameron.whiting No edit summary |
No edit summary |
||
| (3 intermediate revisions by the same user not shown) | |||
| Line 1: | Line 1: | ||
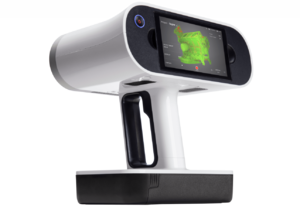
[[File:Artec Leo Scanner.png|thumb|The Artec Leo scanner available.]] | [[File:Artec Leo Scanner.png|thumb|The Artec Leo scanner available.]] | ||
Artec Leo is the only wireless and fully standalone professional 3D scanner designed to make scanning as easy and effortless as possible | Artec Leo is the only wireless and fully standalone professional 3D scanner designed to make scanning as easy and effortless as possible. test | ||
== Specifications == | == Specifications == | ||
| Line 75: | Line 75: | ||
<html><div class="sketchfab-embed-wrapper"> <iframe title="Cameron Jump" frameborder="0" allowfullscreen mozallowfullscreen="true" webkitallowfullscreen="true" allow="autoplay; fullscreen; xr-spatial-tracking" xr-spatial-tracking execution-while-out-of-viewport execution-while-not-rendered web-share width="100%" height="480" src="https://sketchfab.com/models/f2d6b3e368374c5d909ba7321f8c39f7/embed"> </iframe></div> | <html><div class="sketchfab-embed-wrapper"> <iframe title="Cameron Jump" frameborder="0" allowfullscreen mozallowfullscreen="true" webkitallowfullscreen="true" allow="autoplay; fullscreen; xr-spatial-tracking" xr-spatial-tracking execution-while-out-of-viewport execution-while-not-rendered web-share width="100%" height="480" src="https://sketchfab.com/models/f2d6b3e368374c5d909ba7321f8c39f7/embed"> </iframe></div> | ||
</html> | </html> | ||
[[Category:Multimedia]] | [[Category:Multimedia]] | ||
Latest revision as of 11:21, 20 March 2024

Artec Leo is the only wireless and fully standalone professional 3D scanner designed to make scanning as easy and effortless as possible. test
Specifications
| Quatity | Risk Assessment |
|---|---|
| 1 | None but you are required to read the following safety warnings. |
Usage Requirements
Please note that when using the scanner, you must adhere to the following rules:
- This scanner cannot be used without in-person supervision from a technician.
- This equipment may also not leave Curtin’s campus at any time.
- <When using the laser scanner, the user and if people are being scanned must wear protective goggles provided with the scanner. This is due to the scanner using a class-1 laser.
- If people are being scanned, the person being scanned must be at least 1 meter away from the scanner at all times.
- Downloading outcomes of the scans require the software, “Artec Studio 15” which is only available within the DBE Makerspace. Refining scans in this software can be done by a technician.
Documentation
Example Outcomes
Content may take a while to load due to being 3D. Please be patience while it loads.
Animating Scans
If you wish to create a 3D scan of a person and have them animated, you can do so by following these steps:

1. Scanning
- Both the person scanning and person being scanned must wear protective eyewear and be supervised by a trained technician.
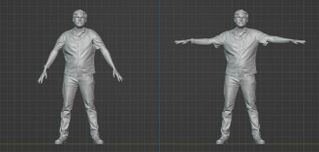
- The person ebing scanned will need to hold a pose for an extended period of time (upwards of 10 minutes) so it is recommended that they have additional equipment to support them if needed. For example, if you wish to animate the users arms you will need the person to be using an “A-Pose” (arms at 45 degrees) or “T-Pose”(arms at 90 degrees) to allow for easier rigging. Tripods can be used to support the scanee’s arms.
- Make sure colour data is turned on when scanning to help with texturing the person.
2. Clean up

- Scans are uploaded to the Artec Leo software at the Makerspace for conversion. Scans are originally made as point clouds which is then converted to geometry and exported out as a texture file (e.g. a .JPG or .PNG) and a 3D file (e.g. .OJB or .FBX).
- If you find there was excessive movement (most commonly seen in hands), export out the mesh and replace the hands with similar 3D scanned hands found online. This can be done using software such as zBrush, Blender or MeshMixer.
3. Rigging
- For rigging and animation, there are two recommended methods:
- Mixamo - Mixamo is a free auto rigging tool created by Adobe. Simply upload your 3D model and follow the auto rigging options provided. Please follow the following link below for more information: https://www.mixamo.com/
- Rigify - Rigify is a free rigging system built into Blender. Please follow the following tutorial below for more information:
4. Animation
Software such as Maya, Blender or other animation software can be used for further animation.